

Oreo Balls Recipe: The Ultimate 3-Ingredient Dessert Everyone Loves
Creating the perfect Oreo balls recipe is easier than you might think. With only three simple ingredients and no baking required, these chocolate-coated delights are a dream come true for dessert lovers. This article will walk you through every detail — from understanding what makes Oreo truffle balls so irresistible to learning the best tips for storage, dipping, and decorating them like a pro. Whether you’re preparing for a party, a family treat, or a last-minute gift, this guide will help you make foolproof Oreo balls every single time.
Learn more about sweet no-bake desserts on this creamy succotash recipe page for inspiration.
Table of Contents
What Is an Oreo Balls Recipe and Why Everyone Loves It
Understanding the Origin of Oreo Truffle Balls
The Oreo balls recipe first became popular in the early 2000s when home bakers began experimenting with simple, no-bake desserts. Combining crushed Oreo cookies, cream cheese, and chocolate coating created a truffle-like treat that was both easy to make and deliciously addictive. This dessert quickly went viral for its minimal ingredients and gourmet presentation, often appearing at weddings, baby showers, and Christmas gatherings.
Unlike many other desserts, Oreo truffle balls don’t require special equipment or baking skills. All you need is a food processor (or a rolling pin for crushing), some mixing, and a bit of creativity. The result? Soft, rich bites coated in a smooth layer of chocolate — the perfect harmony of creamy and crunchy textures that melt in your mouth.
Check out more quick dessert guides like the 3-ingredient biscuit recipe to expand your no-bake collection.
Why This No-Bake Oreo Dessert Is Perfect for Every Occasion
There’s something special about no-bake desserts — they bring instant satisfaction without turning on the oven. The Oreo balls recipe stands out because it fits every occasion. From holiday platters to birthday parties and Valentine’s gifts, these truffles are always a hit. You can decorate them with festive sprinkles, drizzle them with white or dark chocolate, or even use colored candy melts to match your theme.
Plus, they’re an ideal make-ahead treat. You can store them in the fridge or freezer, ready to serve when guests arrive. Their bite-sized shape makes them easy to eat and share, and they’re customizable with endless flavor twists — think mint Oreos, peanut butter filling, or even red velvet coating.
Discover great ideas like the lemon and meringue pie recipe if you love creamy desserts with a twist.
Ingredients Needed for the Perfect Oreo Balls Recipe
Essential Three Ingredients for Oreo Balls
At the heart of every delicious Oreo balls recipe are just three simple ingredients. These classics form the base of the dessert and ensure the perfect combination of creamy, crunchy, and chocolatey goodness.
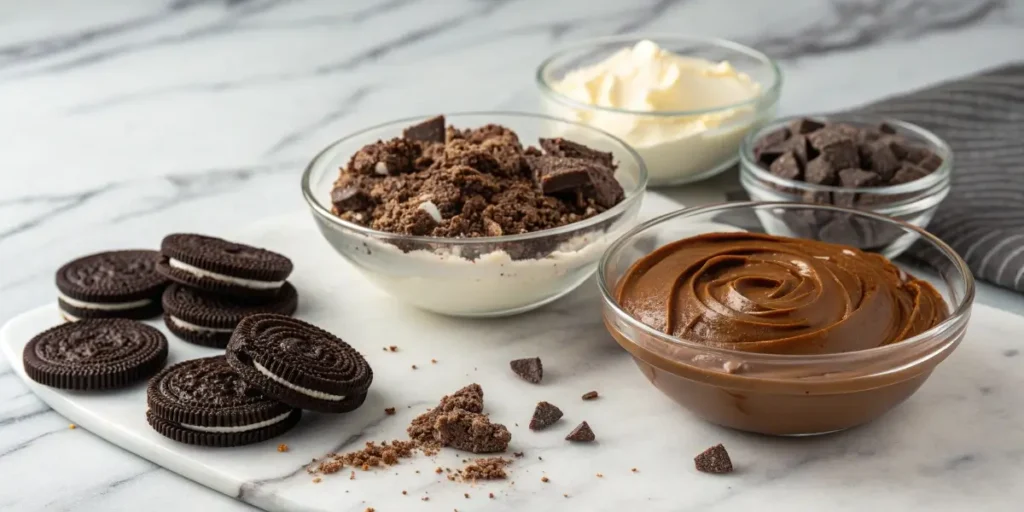
| Ingredient | Quantity | Purpose |
|---|---|---|
| Oreo Cookies | 36 cookies (1 standard package) | The star ingredient providing chocolate crunch and sweetness |
| Cream Cheese (softened) | 8 oz (1 block) | Binds the crushed Oreos into a smooth truffle filling |
| Chocolate (melting wafers, chips, or almond bark) | 12 oz | Used for dipping and coating the Oreo balls for a glossy finish |
You can use any Oreo flavor — classic, golden, mint, or double-stuffed. For a richer flavor, dark chocolate Oreos work beautifully, while golden Oreos create a vanilla-forward variation. If you’re looking for a lighter texture, low-fat cream cheese can be substituted, though the consistency will be slightly softer.
Pro Tip: For the best texture, make sure the cream cheese is room temperature. This allows it to blend smoothly with the crushed Oreos, creating a perfectly creamy base.
Don’t miss our chocolate chip cookie keto candy bar recipe if you enjoy experimenting with rich, chocolate-based treats.
Best Substitutions and Add-Ons for Creative Variations
The beauty of this Oreo balls recipe lies in its flexibility. Once you’ve mastered the basic version, it’s easy to personalize it with fun flavors and textures. Here are some creative ideas to make your Oreo truffles stand out:
- Use flavored cream cheese – Try strawberry, cheesecake, or even whipped cream cheese for a lighter consistency.
- Swap the coating – Replace standard chocolate with white, caramel, or peanut butter-flavored candy melts.
- Add crunch – Mix in crushed nuts, pretzels, or mini chocolate chips to create a crunchy surprise inside.
- Flavor infusions – Add a drop of peppermint or almond extract for festive or elegant variations.
If you’re going dairy-free, opt for vegan cream cheese and dairy-free chocolate. The flavor remains delicious while being suitable for all dietary needs.
Looking for inspiration? Try our keto dark chocolate chips guide to find healthier chocolate options perfect for dipping.
Step-by-Step Guide: How to Make Oreo Balls at Home
Crushing, Mixing, and Shaping the Oreo Mixture
Making the perfect Oreo balls recipe is all about getting the texture right. The process is simple, but a few smart techniques can make a big difference in how smooth and rich your truffles turn out.
Step 1 – Crush the Oreos:
Place your Oreo cookies in a food processor and pulse until you get fine crumbs. If you don’t have one, seal the cookies in a plastic bag and crush them with a rolling pin. Be sure there are no large chunks left; the smoother the crumbs, the creamier your truffle mixture will be.
Step 2 – Mix with Cream Cheese:
In a large mixing bowl, combine the Oreo crumbs with softened cream cheese. Use a spatula or your hands to mix until fully blended. The mixture should feel thick, doughy, and slightly sticky — that’s a sign it’s ready to shape.
Step 3 – Roll into Balls:
Scoop out about one tablespoon of the mixture at a time and roll it into small balls, about 1 inch in diameter. Place them on a parchment-lined baking sheet. You should get around 36 balls from one standard pack of Oreos.
Step 4 – Chill Before Dipping:
Refrigerate the rolled balls for at least 30 minutes or freeze for 15 minutes. Chilling helps them firm up and makes dipping much easier later on.
If you enjoy easy-to-follow recipes like this, don’t miss our delicious Toll House cookies for another sweet classic that’s great for sharing.
Dipping and Decorating Oreo Truffles for a Professional Look
Once your truffles are chilled, it’s time to coat them with chocolate. This is the most fun and creative part of making your Oreo balls recipe — and where you can add your personal touch.
Step 1 – Melt the Chocolate:
Use microwave-safe melting wafers, chocolate chips, or almond bark. Microwave in 30-second intervals, stirring each time until smooth. For a glossy finish, add a teaspoon of coconut oil to the melted chocolate.
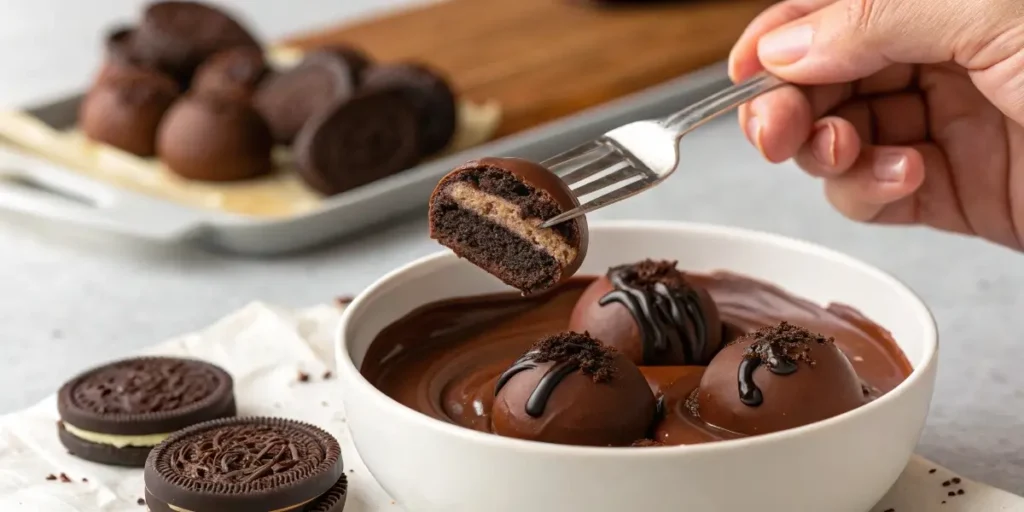
Step 2 – Dip the Balls:
Using a fork or a dipping tool, lower each ball into the melted chocolate and gently tap off the excess. Place the coated truffles back on parchment paper.
Step 3 – Decorate:
Before the coating sets, sprinkle crushed Oreos, drizzle contrasting chocolate, or top with colored sprinkles. Allow them to set at room temperature for about 15 minutes or refrigerate to speed up the process.
These truffles look as if they came straight from a bakery — shiny, smooth, and irresistible. You can even wrap them in mini cupcake liners or boxes for gifting.
Looking for more ideas like this? Discover great dessert inspirations such as chocolate-covered Rice Krispie treats and pistachio butter guide for more chocolatey goodness.
Tips for Perfectly Dipped Oreo Balls
The Easiest Way to Dip Oreo Balls Without a Mess
Dipping is often the trickiest part of making the Oreo balls recipe, but with a few smart hacks, you can achieve smooth, even coatings every time. The key is in temperature control and the right tools.
1. Chill Your Oreo Balls Properly:
Before dipping, refrigerate or freeze the shaped Oreo balls for at least 30 minutes. Cold truffles firm up, preventing them from falling apart in warm chocolate. However, don’t freeze them solid — overly frozen balls can cause cracking later as they thaw.
2. Use the Right Dipping Tools:
A fork or candy-dipping tool works wonders. Place the Oreo ball on the fork, dip it fully into the melted chocolate, then gently tap the fork on the bowl’s edge to remove any excess coating. Avoid piercing the ball with a skewer; it can cause it to break or leave holes once the chocolate sets.
3. Keep Chocolate Warm and Smooth:
If your melted chocolate starts to thicken, reheat it in 15-second intervals. Stir in a teaspoon of coconut oil or vegetable shortening to keep it silky. This ensures that the coating spreads evenly and doesn’t clump or streak.
4. Work in Small Batches:
Take a few Oreo balls out of the fridge at a time to dip. Keeping the rest chilled ensures they stay firm and easy to handle.
Don’t miss our how-to-make-coconut-milk guide — it’s another great read for anyone looking to master smooth, silky dessert ingredients like this one.
Common Mistakes to Avoid When Coating with Chocolate
Even seasoned bakers can face a few challenges when coating Oreo truffles, from cracking shells to uneven textures. Here are some pitfalls to avoid:
1. Overheating the Chocolate:
Too-hot chocolate can cause your coating to thicken or seize. Always melt it slowly and stir frequently.
2. Using Wet Utensils:
Water is chocolate’s worst enemy. A single drop can make it seize up into a grainy mess. Ensure all bowls and tools are completely dry before dipping.
3. Forgetting to Tap Off Excess Chocolate:
If too much chocolate remains on the Oreo balls, you’ll get thick, uneven layers. Gently tapping off the extra ensures a thin, even coating.
4. Not Letting the Coating Set Properly:
Give your truffles enough time to set at room temperature before refrigerating. Cooling too quickly can cause condensation and dull the shine.
Want to elevate your chocolate dipping skills even more? Check out our garlic shrimp gratin recipe — it’s not sweet, but it’s a masterclass in timing and texture for any home cook.
Storing, Freezing, and Serving Oreo Balls
Do Oreo Balls Need to Be Refrigerated or Frozen?
Yes — and here’s why! The Oreo balls recipe uses cream cheese as a binding ingredient, which means refrigeration is essential to keep them fresh and safe to eat. Room temperature is not ideal for storing these truffles because the cream cheese can spoil and the chocolate coating can soften or melt.
Refrigeration Tips:
- Once dipped and set, store your Oreo balls in an airtight container.
- Place a layer of parchment paper between layers to prevent them from sticking together.
- Keep refrigerated for up to 2 weeks for the best flavor and texture.
Freezing Tips:
- To freeze, arrange the Oreo truffles on a baking sheet and freeze until solid.
- Then transfer them to a freezer-safe container or zip-lock bag.
- They can last up to 2 months in the freezer without losing flavor.
- When ready to serve, thaw them in the refrigerator overnight — not at room temperature — to prevent “sweating” (condensation).
These storage techniques ensure your Oreo truffle balls remain creamy and rich, even days or weeks after you’ve made them. If you love freezer-friendly recipes, check out our sourdough French toast bake — another make-ahead winner for busy mornings.
How to Store Oreo Truffle Balls for Freshness and Flavor
To maintain the perfect texture, keep your Oreo dessert balls chilled and sealed tightly. Exposure to air and temperature changes can lead to dryness or condensation on the surface.
Here’s a quick guide to help you choose the best storage method:
| Storage Method | Temperature | Shelf Life | Best For |
|---|---|---|---|
| Room Temperature | 68–72°F | 2–3 hours | Serving immediately |
| Refrigerator | 35–40°F | Up to 2 weeks | Short-term storage |
| Freezer | 0°F | Up to 2 months | Long-term storage |
Pro Tip: If you’re making Oreo balls for a party, refrigerate them until about 15–20 minutes before serving. This allows them to soften slightly for that perfect creamy bite.
Want to serve them creatively? Place your truffles on a dessert platter, drizzle with white chocolate, and top with crushed candy canes or nuts for an elegant touch.
Looking for more dessert prep guides? Learn how to keep your confections fresh with our homemade rhubarb jam tips — perfect for preserving flavor.
Troubleshooting — Why Your Oreo Balls Might Sweat or Crack
Understanding “Sweating” and How to Prevent It
If you’ve ever noticed your Oreo balls recipe turning a bit shiny or sticky after coming out of the fridge, don’t panic — that’s just condensation or “sweating.” It happens when cold truffles meet warm air. The moisture on the surface can dull the chocolate’s shine and affect their texture if not handled correctly.
Here’s why it happens — and how to fix it:
1. Sudden Temperature Change:
When you transfer your Oreo balls straight from the fridge or freezer into a warm room, the chocolate coating reacts to the humidity. To avoid this, let the truffles sit in their container with the lid slightly open for 10–15 minutes before fully uncovering them. This helps them adjust to room temperature gradually.
2. Improper Storage:
If your Oreo balls are stored in a damp or humid environment, moisture will build up inside the container. Always store them in a cool, dry space inside the refrigerator.
3. Coating Too Thin:
A thin chocolate coating doesn’t protect the truffle from moisture as well as a thicker one. Double-dipping can help prevent this and create a smoother, more professional finish.
Pro Tip: You can also line your container with a paper towel to absorb any excess moisture during storage.
If you want to learn more about keeping desserts fresh, check out our guide on baked orange roughy recipe — it includes smart cooling techniques that apply to both savory and sweet dishes.
Fixing Broken or Too-Soft Oreo Truffles
Sometimes your Oreo truffle balls might crack, crumble, or turn too soft. Luckily, most of these issues are easy to fix with a few adjustments.
1. Cracking:
This usually occurs when the Oreo balls are too cold before dipping. If frozen solid, they expand as they warm, causing cracks in the coating. To prevent this, refrigerate rather than freeze before dipping, or let frozen truffles sit at room temperature for 5 minutes before coating.
2. Too Soft or Sticky:
Too much cream cheese can cause the mixture to feel mushy. To firm it up, add a few extra crushed Oreos and refrigerate again. You’ll get the perfect consistency for shaping and dipping.
3. Uneven Texture:
If your mixture isn’t blending evenly, use a hand mixer or food processor for a smoother dough. You can also refrigerate the dough for 15 minutes before shaping to make it less sticky.
4. Chocolate Coating Falls Off:
If the chocolate doesn’t stick, ensure your Oreo balls are fully chilled and dry before dipping. Excess moisture prevents chocolate from adhering properly.
For more texture tips and dessert troubleshooting, explore our delicious milk street recipes — they’re filled with professional kitchen techniques you can apply at home.
Creative Oreo Ball Variations

Holiday-Themed and Seasonal Oreo Ball Ideas
The Oreo balls recipe is endlessly customizable, making it perfect for every season or holiday. With just a few tweaks in flavor, color, or decoration, you can turn these truffles into stunning themed desserts that fit any celebration.
1. Christmas Oreo Balls:
Dip your Oreo balls in white chocolate and decorate with red and green sprinkles or crushed candy canes. You can even use peppermint extract in the filling for a festive twist.
2. Valentine’s Day Truffles:
Use pink candy melts or tinted white chocolate for a romantic look. Drizzle with dark chocolate and top with tiny heart sprinkles for an adorable gift idea.
3. Halloween Oreo Balls:
Go spooky with orange candy melts and black drizzle. You can even stick candy eyes on top for fun “monster” truffles that kids will love.
4. Easter Oreo Balls:
Roll the truffles in pastel-colored sprinkles or shredded coconut dyed with food coloring for a soft spring feel.
5. Summer Oreo Pops:
Insert lollipop sticks into your chilled Oreo balls before dipping them — they become bite-sized Oreo pops perfect for outdoor gatherings or parties.
You can discover more seasonal dessert inspiration with our delicious Easter desserts ideas — they’re colorful, festive, and pair beautifully with your Oreo truffles.
Flavored Coatings and Toppings to Elevate Your Oreo Dessert
If you want to take your Oreo truffle balls beyond the basics, experimenting with different coatings and toppings can transform their taste and texture. Here are some popular combinations that have proven to be crowd favorites:
| Coating | Topping Ideas | Flavor Profile |
|---|---|---|
| White Chocolate | Crushed peppermint, cookie crumbs | Sweet & festive |
| Dark Chocolate | Sea salt, cocoa powder | Rich & bold |
| Milk Chocolate | Toffee bits, chopped nuts | Classic & crunchy |
| Peanut Butter Chocolate | Mini chocolate chips | Nutty & smooth |
| Caramel Coating | Sea salt flakes | Sweet-salty perfection |
Creative Flavor Add-ins:
- Mix peanut butter or Nutella into your Oreo and cream cheese base.
- Add crushed pretzels for a salty twist.
- Swirl in melted caramel for a gooey center.
- Infuse with a splash of espresso for mocha-flavored Oreo balls.
If you love experimenting with flavor combinations, don’t miss our delicious Moroccan chicken tagine — it’s savory, but it teaches balance and layering of flavors, just like desserts do.
Safety and Nutrition Facts
Are Oreo Truffle Balls Safe to Eat?
Yes — when prepared and stored properly, the Oreo balls recipe is completely safe to eat. However, because these no-bake truffles contain cream cheese, handling and storage are key to keeping them fresh and free from spoilage.
Safe Handling Tips:
- Use Fresh Cream Cheese: Always check the expiration date before mixing.
- Keep Cold: Store Oreo balls in the refrigerator at all times unless they’re being served.
- Avoid Leaving Out Too Long: If serving at a party, don’t let them sit at room temperature for more than 2 hours.
- Freeze for Longer Storage: Frozen Oreo balls can stay safe for up to 2 months if properly sealed.
If your Oreo truffles develop a sour smell, sticky texture, or off taste, discard them immediately — these are signs of cream cheese spoilage.
To explore more food safety and storage tips, check out our homemade chicken and gravy guide — it covers safe cooling and refrigeration steps that apply to desserts too.
Calories, Storage Safety, and Allergy Considerations
While the Oreo dessert balls are a sweet indulgence, it’s always good to know what’s inside each bite. Below is the approximate nutritional breakdown per truffle (based on a batch of 36 Oreo balls):
| Nutritional Component | Per Serving (1 Oreo Ball) |
|---|---|
| Calories | 110–130 kcal |
| Total Fat | 6 g |
| Saturated Fat | 3.5 g |
| Sugar | 9 g |
| Protein | 1 g |
| Carbohydrates | 14 g |
Allergy Notes:
- Contains wheat, dairy, and soy from Oreos and cream cheese.
- To make a gluten-free version, use certified gluten-free Oreo cookies and dairy-free cream cheese alternatives.
- Always read labels carefully if serving to guests with allergies.
Pro Tip: You can lighten up your recipe by using reduced-fat cream cheese and sugar-free chocolate coatings without compromising flavor.
Looking for other light dessert ideas? Discover great healthy alternatives like the sugar-free ice cream or our healthy apple crumble recipe — both are delicious ways to enjoy sweetness guilt-free.
Conclusion: The Sweet Simplicity of Oreo Balls Recipe
The Oreo balls recipe proves that you don’t need fancy ingredients or complex baking techniques to create something spectacular. With just three key components — Oreos, cream cheese, and chocolate — you can craft a dessert that looks stunning, tastes heavenly, and satisfies any sweet craving.
These no-bake Oreo truffles are perfect for holidays, parties, or anytime you need a quick dessert fix. They’re customizable, freezer-friendly, and crowd-pleasing — a true all-around winner. Whether you’re making them for your family or gifting them to friends, Oreo balls are guaranteed to impress.
Looking for inspiration? Try pairing them with our delicious bagelry gluten-free bagels for a sweet-and-savory combo that surprises everyone.
FAQs
What Are the Ingredients for Oreo Balls?
The classic Oreo balls recipe requires only three simple ingredients: Oreo cookies, cream cheese, and chocolate coating. These three elements combine to create a rich, creamy truffle that’s perfectly balanced in texture and flavor. You can mix things up by using different Oreo flavors, flavored cream cheeses, or even colorful candy melts for the coating.
What Is the Easiest Way to Dip Oreo Balls?
The easiest way to dip your Oreo balls is to use a fork or candy-dipping tool. Chill the Oreo truffles for at least 30 minutes before dipping, ensuring they’re firm enough to handle the melted chocolate without breaking. Submerge each truffle completely, lift it out with the fork, and gently tap to remove excess coating before placing it on parchment paper to set.
What Are the Three Ingredients in Oreo Dessert?
The three core ingredients in any Oreo dessert balls recipe are:
Crushed Oreo cookies
Softened cream cheese
Melted chocolate (for dipping)
That’s it! These simple ingredients make the recipe foolproof and beginner-friendly.
Do Oreo Balls Have to Stay in the Fridge?
Absolutely. Because they contain cream cheese, Oreo balls must be refrigerated to stay safe and maintain their texture. Keep them in an airtight container lined with parchment paper for up to 2 weeks in the refrigerator or up to 2 months in the freezer.
Why Are My Oreo Balls Sweating?
“Sweating” occurs when cold Oreo balls meet warm air, creating condensation on the chocolate coating. To prevent it, allow the truffles to sit in a closed container for 10–15 minutes before exposing them to room air. This helps them acclimate gradually and keeps their coating smooth and glossy.
Are Oreo Truffle Balls Safe to Eat?
Yes, Oreo truffles are safe to eat when made with fresh ingredients and stored properly. Always use fresh cream cheese and keep your truffles refrigerated. For dairy-free or vegan versions, replace cream cheese and chocolate with plant-based alternatives.