
Steamed Brussel Sprouts – The Simple, Healthy, and Delicious Way to Cook Them
Steamed Brussel sprouts are the perfect mix of comfort and nutrition. With their mild, nutty flavor and tender bite, these little green gems can easily elevate any meal. Whether you’re new to cooking vegetables or looking for a healthier alternative to roasting or frying, steaming offers the simplest, cleanest way to bring out their best. In this guide, we’ll explore everything from prep to timing, seasoning, and even how top chefs like Gordon Ramsay and Jamie Oliver prepare them—without making the process long or complicated. Learn more about other wholesome vegetable recipes in our gluten-free side dishes collection to keep your meals light and flavorful.
Table of Contents
Why Steamed Brussel Sprouts Deserve a Spot on Your Table
The Nutritional Power of Brussel Sprouts
Brussel sprouts may be small, but they pack a serious nutritional punch. Each serving is loaded with vitamin C, vitamin K, and dietary fiber—all essential for a healthy immune system and good digestion. They’re also rich in antioxidants like kaempferol, which helps reduce inflammation and supports heart health. For anyone watching their weight, steamed Brussel sprouts are naturally low in calories and fat, making them one of the healthiest side dishes around. Unlike frying or sautéing, steaming helps lock in these vitamins instead of cooking them away. If you’re following a vegan or gluten-free diet, steamed Brussel sprouts fit perfectly into your routine without any special ingredients or extra effort.
Why Steaming is the Healthiest Cooking Method
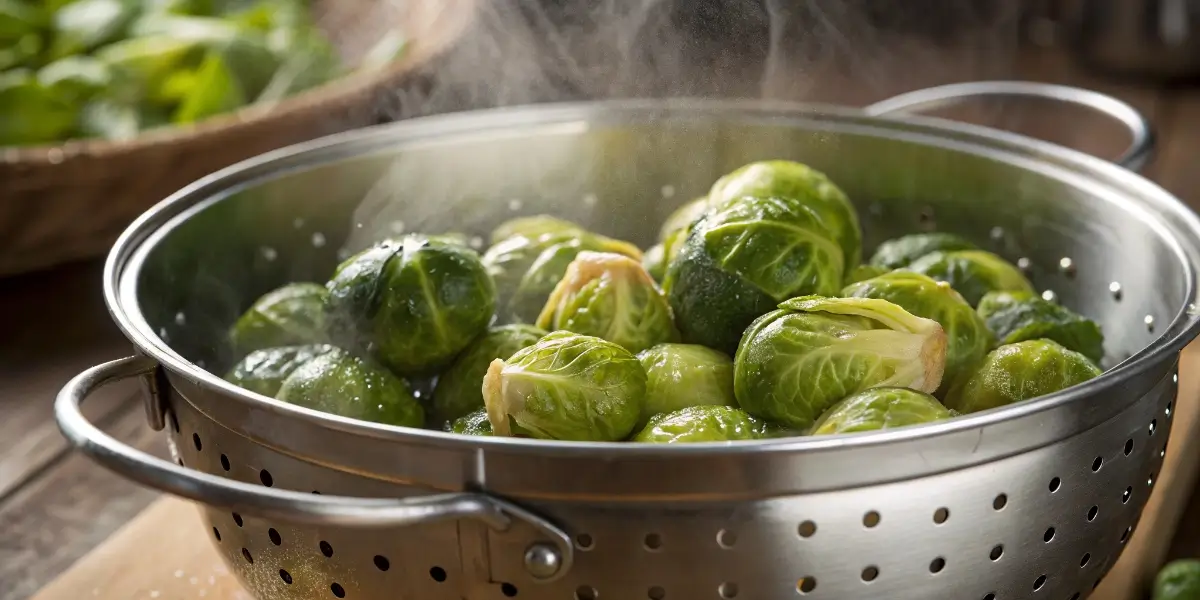
Steaming is one of the best ways to cook Brussel sprouts because it preserves both nutrients and texture. While boiling often leads to soggy vegetables and lost vitamins in the water, steaming keeps the sprouts crisp-tender and nutrient-rich. The process uses only water vapor—no oils or fats—so your dish stays naturally light and heart-friendly. Plus, steaming brings out the sprouts’ subtle sweetness, balancing their earthy flavor beautifully. It’s quick too—usually done in under 10 minutes—making it an ideal option for weeknight dinners.
Don’t miss our delicious savory southern rutabagas for another example of how simple cooking can be incredibly flavorful without being heavy.
How to Prepare Brussel Sprouts Before Steaming
Choosing Fresh Brussel Sprouts at the Store or Market
Perfect steamed Brussel sprouts start with fresh, quality produce. When shopping, look for sprouts that are firm, compact, and bright green. Avoid any with yellowing leaves or black spots, as these are signs of age or decay. Smaller sprouts—about the size of a large marble—tend to be sweeter and cook faster, while larger ones can have a stronger, cabbage-like flavor. If you can, buy Brussel sprouts still on the stalk, as they stay fresher longer.
Store your sprouts unwashed in a perforated bag in the crisper drawer of your refrigerator. They’ll stay good for up to a week, though the sooner you steam them, the better the flavor and texture. For meal planners or batch cooks, keeping your ingredients fresh helps ensure your veggies taste vibrant when it’s time to cook.
Looking for other fresh produce ideas? Check out our roasted butternut squash recipe for another wholesome, vegetable-forward dish.
Cleaning, Trimming, and Cutting for Perfect Texture
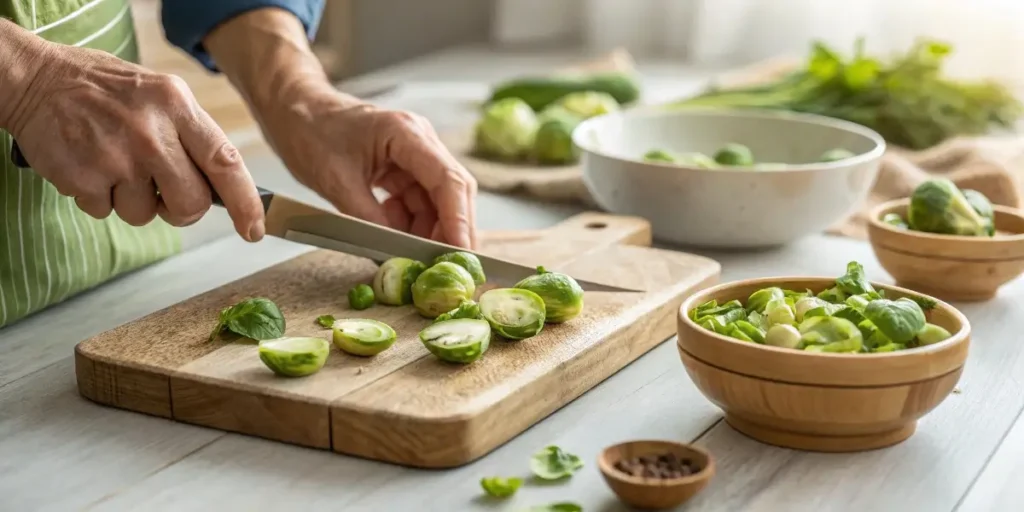
Proper prep is key to delicious steamed Brussel sprouts. Start by rinsing them thoroughly under cold water to remove any dirt between the leaves. Next, trim the tough stem ends, but don’t cut too deep—just enough to remove any discolored or dry bits. Peel away any loose or wilted outer leaves. If your sprouts are large, slice them in half lengthwise.
This not only helps them cook more evenly but also allows steam to penetrate the core for consistent tenderness.
For an even quicker cooking time, score a small “X” on the bottom of each whole sprout before steaming. This trick ensures heat reaches the dense center without overcooking the outer leaves. Once cleaned and trimmed, your Brussel sprouts are ready to hit the steamer.
Don’t miss our parmesan smashed potatoes for another side that pairs beautifully with any protein.
How Long to Steam Brussel Sprouts (Timing Guide)
Ideal Steaming Times for Whole and Halved Sprouts
Timing is everything when it comes to steamed Brussel sprouts. Overcooking them can make them mushy and give off that strong sulfur smell many people associate with poorly cooked sprouts. To get them just right, the size and cut matter. For whole Brussel sprouts, steam them for 8 to 10 minutes, depending on their size. If they’re on the smaller side, check around 7 minutes.
For halved sprouts, you’ll only need about 5 to 6 minutes.
You’ll know they’re done when they’re tender enough to pierce easily with a fork but still hold their shape. The key is to let them cook just until they’re bright green and lightly tender—never dull or limp. If you’re steaming them in batches for meal prep, you can under-steam slightly and reheat gently later to keep the perfect texture.
For those who love perfectly timed vegetable sides, learn more about our instant pot quinoa recipe that follows similar precision for light, fluffy results.
Testing for Doneness Without Overcooking
The easiest way to test your steamed Brussel sprouts is with a fork or sharp knife. If it slides in smoothly but the sprout still feels firm to the touch, they’re ready. Another good sign—they should look glossy, not dry or shriveled. Remember, Brussel sprouts continue to cook for a minute or two even after being removed from the steamer, so it’s smart to take them out just before they’re fully done.
Avoid lifting the steamer lid too often, as that releases the heat and slows cooking. Instead, check only once toward the end of the cooking time. If you prefer your sprouts softer, extend the steaming by 1 to 2 minutes, but keep an eye on the color—it should remain a lively green.
To make perfectly tender vegetables every time, don’t miss our baby dutch yellow potatoes recipe for another quick-cooking side that complements any meal beautifully.
Step-by-Step Guide to Perfect Steamed Brussel Sprouts
Essential Tools You’ll Need
Before diving into the steaming process, make sure you have the right setup. You don’t need fancy equipment—just a few kitchen basics:
- A steamer basket or insert: This holds your Brussel sprouts above the water line to allow even steam circulation.
- A pot with a tight-fitting lid: A snug lid traps the steam inside, ensuring the sprouts cook evenly and quickly.
- Tongs or a slotted spoon: For safely removing hot sprouts once they’re done.
If you don’t own a steamer basket, no problem! You can use a metal colander that fits inside a pot, or even a microwave steamer. The key is keeping the sprouts elevated above the water so they steam rather than boil. For other handy vegetable prep tips, discover great ideas like our how to make coconut milk guide that teaches you how to make creamy, plant-based bases from scratch.
Easy Method to Steam Brussel Sprouts Like a Pro
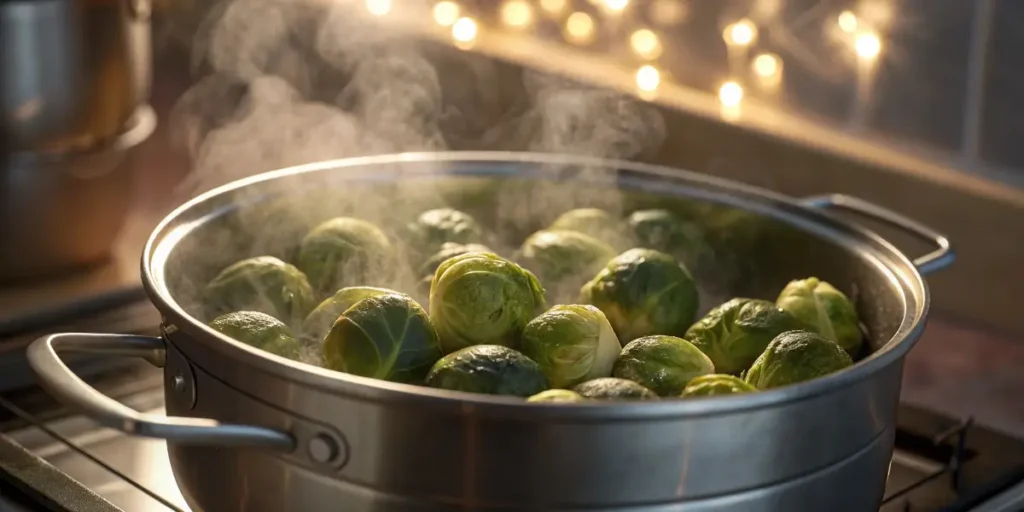
- Prepare the steamer: Fill your pot with about an inch of water—just enough to create steam without touching the sprouts. Bring it to a boil.
- Add the Brussel sprouts: Once boiling, place your cleaned and trimmed sprouts in the steamer basket, then cover with the lid.
- Steam gently: Let them cook for 5–10 minutes, depending on whether they’re halved or whole. Avoid lifting the lid too often to maintain steady steam.
- Check for doneness: Pierce one with a fork—it should be tender but still bright green.
- Season immediately: After steaming, toss the hot sprouts with a drizzle of olive oil, a pinch of sea salt, and a squeeze of lemon juice for a fresh pop of flavor.
For a little inspiration, don’t miss our gluten-free summer salads—a collection of refreshing sides that pair beautifully with steamed vegetables. And if you’re meal-prepping, consider steaming extra sprouts to add to grain bowls, wraps, or salads throughout the week.
Flavor Boosters for Steamed Brussel Sprouts
Healthy Seasoning Ideas (Garlic, Lemon, Olive Oil)
Steamed Brussel sprouts taste great on their own, but the right seasonings can take them from simple to spectacular. Start with a drizzle of extra virgin olive oil for richness, then add a squeeze of fresh lemon juice to brighten the flavor. A sprinkle of sea salt and cracked black pepper enhances their natural sweetness, while minced garlic or roasted garlic paste adds depth and aroma.
If you enjoy a hint of spice, try crushed red pepper flakes or a dusting of smoked paprika. For a nutty touch, toss the sprouts with toasted almonds or chopped walnuts right before serving. These toppings not only improve texture but also add healthy fats. You can also experiment with herbs like thyme, rosemary, or parsley for a fresh, earthy twist.
For more inspiration on balanced flavor pairings, check out our vegan yum yum sauce recipe —a versatile condiment that complements steamed veggies without adding unnecessary calories or dairy.
Low-Calorie Sauces and Glazes That Elevate Taste
A light sauce can transform steamed Brussel sprouts into a restaurant-worthy dish. Mix a quick dressing using Dijon mustard, olive oil, and apple cider vinegar for a tangy kick. Or whisk together honey, lemon, and garlic for a subtly sweet glaze that brings out the sprouts’ natural caramel notes.
If you’re aiming for a vegan-friendly option, blend tahini, lemon juice, and water into a silky drizzle that adds creaminess without dairy. Want something bold yet healthy? A spoonful of balsamic reduction or soy-free teriyaki glaze gives your sprouts a gourmet touch in seconds.
Flavor doesn’t have to mean heavy—simple, clean ingredients keep your steamed Brussel sprouts both wholesome and delicious.
Don’t miss our creamy vegan hollandaise sauce for another sauce idea that brings vegetables to life without any butter or eggs.
Steamed vs. Boiled Brussel Sprouts – What’s the Difference?
Comparing Nutrition and Texture Between the Two
Steamed and boiled Brussel sprouts might look similar, but they’re worlds apart when it comes to taste, texture, and nutrition. When you steam Brussel sprouts, they cook gently with steam vapor instead of sitting in water. This method preserves up to 30% more vitamins and minerals—especially vitamin C and folate—which are often lost when boiling. Steaming also keeps their texture firm yet tender, giving you that perfect bite without the mushiness.
Boiling, on the other hand, tends to make sprouts waterlogged and dull in color. Nutrients leach into the boiling water, leaving less behind for your body. If you love that clean, crisp-green look, steaming is definitely the better option. Plus, it highlights the vegetable’s natural nutty sweetness without needing butter or heavy seasonings.
To explore more cooking methods that retain nutrients, learn more about our delicious hibachi chicken recipe, which also uses quick, high-heat techniques to keep food flavorful yet light.
Why Steaming Wins in Flavor and Health Benefits
When you steam Brussel sprouts, you’re not just keeping nutrients intact—you’re maximizing flavor. The gentle cooking prevents bitterness and allows the sprouts’ subtle sweetness to shine through. Unlike boiling, where water washes away taste, steaming locks flavor in. It also means you can use less salt or oil because the sprouts don’t need much help to taste great.
From a health perspective, steaming also requires zero added fat. This makes it perfect for heart-healthy, low-calorie diets. You can add flavor afterward with lemon, olive oil, herbs, or even a splash of vinegar for brightness.
If you’re craving variety, check out our mediterranean quinoa salad—a light and nutrient-rich dish that pairs wonderfully with steamed Brussel sprouts for a balanced, energizing meal.
Celebrity Chef Inspiration – Gordon Ramsay and Jamie Oliver
How Gordon Ramsay Makes His Brussel Sprouts Shine
Gordon Ramsay is known for transforming simple vegetables into gourmet dishes, and Brussel sprouts are no exception. While he often roasts them for that signature caramelized flavor, his steamed version is all about precision and simplicity. Ramsay starts with fresh, halved Brussel sprouts, lightly salted water, and just enough steam to tenderize without softening too much. Once steamed, he tosses them immediately with a drizzle of olive oil, a pinch of sea salt, and a quick squeeze of lemon to brighten the flavors.
Sometimes, he adds a little garlic or shallot for aroma, but never overpowers the natural sweetness of the sprouts. The result? Crisp-tender, glossy greens that taste clean and fresh—proof that steamed Brussel sprouts don’t need bacon or butter to be indulgent.
If you enjoy celebrity-inspired cooking, check out our gordon ramsay beef wellington recipe to explore his balance of technique and flavor in a hearty main course.
Jamie Oliver’s Creative Twist on Steamed Brussel Sprouts
Jamie Oliver brings his signature rustic charm to Brussel sprouts, often emphasizing healthy, no-fuss cooking. His approach to steamed Brussel sprouts focuses on texture and layering flavor naturally. He steams them until just tender, then tosses them in a warm pan with olive oil, lemon zest, and fresh herbs like thyme or mint for an added pop. The key, he says, is “don’t overcook them—keep them vibrant and full of life.”
Jamie also recommends adding a handful of lightly toasted nuts or seeds for crunch or finishing with a spoonful of natural yogurt mixed with garlic and lemon for a creamy, tangy drizzle. It’s wholesome, plant-forward cooking at its best—proof that simple ingredients can deliver restaurant-level results.
For another chef-worthy side dish idea, discover our halibut taco recipe that balances light flavors and textures perfectly with steamed veggies.
Common Mistakes and How to Avoid Them
Overcooking and Mushy Sprouts Fixes
One of the most common mistakes when making steamed Brussel sprouts is overcooking. It’s easy to leave them in the steamer a minute too long, which turns their crisp, bright texture into something soft and sulfurous. The solution? Timing and testing. Always start checking your sprouts a minute or two before the suggested cooking time ends. They should be tender when pierced with a fork but still vibrant green.
If you do overcook them, don’t toss them out! You can turn them into something new—like a creamy soup or a mashed veggie side. Simply blend them with a bit of olive oil, garlic, and a splash of vegetable broth for a flavorful rescue.
For more foolproof cooking methods, check out our panera corn chowder recipe—it’s a great example of balancing texture and timing perfectly for creamy yet hearty results.
Tips to Keep Brussel Sprouts Bright and Crunchy
The secret to crisp-tender Brussel sprouts is managing steam exposure and post-cooking care. Don’t overcrowd your steamer basket; overcrowding traps moisture unevenly and causes sogginess. Give each sprout some space for the steam to circulate freely. Once cooked, transfer them immediately to a bowl of ice water for 30 seconds. This quick “shock” stops the cooking process and locks in that gorgeous green color. Then, reheat briefly or toss in olive oil before serving.
Adding a squeeze of lemon or a splash of vinegar right before serving not only adds flavor but also keeps them tasting fresh.
For a colorful, nutrient-packed meal pairing, don’t miss our 10 vegetable soup recipe —a perfect match for crisp steamed Brussel sprouts.
Serving Ideas and Pairings
Side Dish Combinations That Work Perfectly
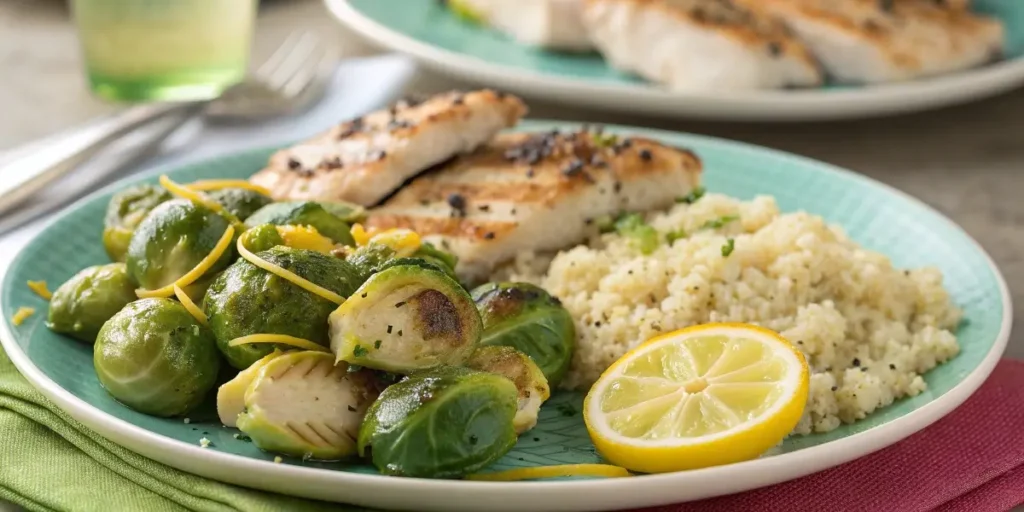
Steamed Brussel sprouts are incredibly versatile and pair beautifully with both plant-based and protein-packed mains. For a balanced, healthy plate, serve them alongside grilled salmon, baked chicken, or a hearty quinoa bowl. Their mild, nutty flavor also complements creamy dishes like mashed potatoes or grain-based sides such as brown rice or couscous.
For a vegan meal, try pairing them with roasted sweet potatoes or lentil patties for texture contrast. Drizzle your sprouts with a touch of balsamic glaze or tahini dressing for extra flavor without adding heaviness.
And if you’re looking for a wholesome family dinner idea, don’t miss our chicken ricotta meatballs with spinach alfredo sauce —their creamy, savory flavor works wonderfully with steamed veggies on the side.
Meal Prep and Storage Tips for Busy Weeks
Steamed Brussel sprouts are one of the easiest vegetables to meal prep. Once steamed and cooled, store them in an airtight container in the fridge for up to four days. To reheat, use a microwave or lightly sauté them in a pan with a drizzle of olive oil and a splash of water to refresh their texture. Avoid freezing—Brussel sprouts tend to lose their structure and flavor when thawed after steaming.
If you’re planning meals ahead, you can steam them slightly underdone, then finish cooking them when ready to serve. This method ensures they stay firm and fresh-tasting. Combine them with other quick-prep veggies for mix-and-match lunches throughout the week.
Looking for inspiration? Check out our delicious Moroccan chicken tagine for a flavorful, global pairing.
Conclusion
Steamed Brussel sprouts prove that simplicity and nutrition can go hand in hand. By mastering the basics—fresh ingredients, proper prep, and just the right amount of steam—you can turn this humble vegetable into a flavorful, vibrant side dish. Whether you enjoy them plain with a sprinkle of salt and lemon or dressed up with light sauces and herbs, steaming keeps their natural sweetness intact and their nutrients preserved.
This method stands out not only for health-conscious eaters but also for busy home cooks who want something quick, wholesome, and versatile. Pair them with proteins like chicken or salmon, or add them to vegan bowls for a balanced, colorful plate.
If you’re ready to explore other easy, nutrient-rich vegetable dishes, don’t miss our gluten-free fettuccine alfredo.
FAQs
How long do you steam Brussels sprouts for?
The perfect steaming time depends on the size and whether they’re cut. Whole Brussels sprouts take about 8 to 10 minutes, while halved sprouts need only 5 to 6 minutes. Always check for doneness by piercing one with a fork—it should glide in easily but still feel slightly firm. Overcooking makes them mushy and dull in color, so it’s better to err on the side of slightly undercooked for a crisp-tender texture.
Is it better to boil or steam Brussels sprouts?
Steaming is the healthier and tastier option. Boiling can leach out valuable nutrients and create soggy sprouts, while steaming preserves vitamins, color, and crunch. Steamed Brussel sprouts retain their natural sweetness and nutty flavor, making them the better choice for both health and taste.
Should I cut Brussel sprouts in half before steaming?
Yes—especially if they’re large. Cutting them in half allows steam to penetrate evenly, ensuring each piece cooks through without becoming overdone. Smaller sprouts can be left whole, but halving them also helps shorten cooking time and gives a softer bite.
How does Gordon Ramsay cook his Brussels sprouts?
Gordon Ramsay prefers steaming or sautéing Brussels sprouts until just tender, then tossing them with olive oil, lemon juice, and sea salt. Sometimes, he adds minced garlic or shallots for extra flavor. His version focuses on bringing out the natural sweetness without overcomplicating the dish—simple, elegant, and full of flavor.
How does Jamie Oliver cook Brussels sprouts?
Jamie Oliver’s approach to Brussels sprouts is fresh and creative. He often steams them briefly, then finishes them with herbs, lemon zest, and a touch of olive oil. Sometimes, he sprinkles over toasted nuts or a dollop of garlicky yogurt dressing for a modern, healthy twist. His goal is to keep them bright, green, and deliciously simple.
What is the healthiest way to cook Brussels sprouts?
The healthiest way is to steam Brussels sprouts and season them lightly with heart-healthy olive oil, lemon, or herbs. This method keeps calories low and nutrients high, without the need for butter or heavy sauces. Steamed sprouts are naturally gluten-free, vegan, and rich in fiber—making them one of the best vegetables you can add to your diet.